Toluna Start offers several options to select from upon logging into the user interface.
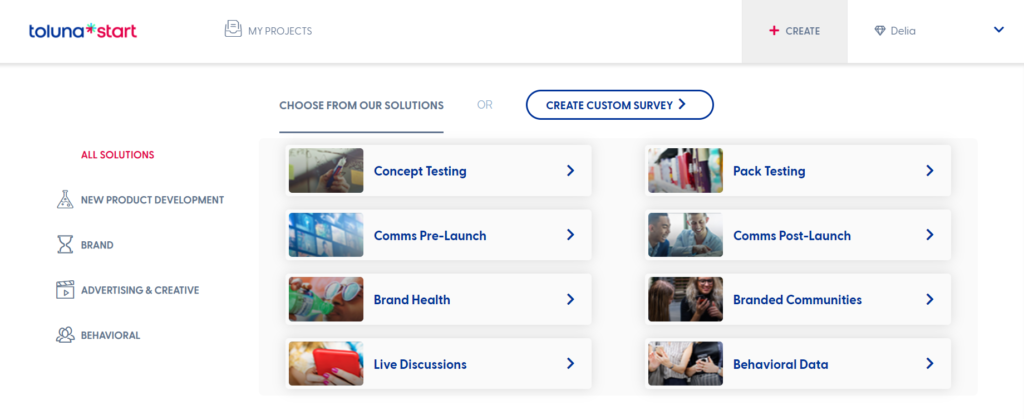
To view all available solutions, you can either scroll down to the tiles on your homepage or select the +CREATE menu on the top right of your screen.
The available solutions on Toluna Start consist of custom surveys, enabling you to build from scratch and fully customize a survey, and a suite of our solutions consisting of automated options to qualitative engagement solutions.
The available solutions within Toluna Start range from custom surveys, to our automated solutions covering new product development, brand, and advertising/creative, and our qualitative engagement solutions.
Our automated solutions include a core set of predefined metrics and developed using expert research methodology and a real-time infoboard output highlighting key metrics and KPIs. If you’re interested in a qualitative approach, Live Discussions can be used to run qualitative engagements and even used as a wrap-around approach to complement other platform solutions, while Branded Communities allows you to create your own panel of members.
In this post, we’ll focus on Creating a Custom Survey. (You can click here for more information on our automated solutions and here for information on our qualitative solutions.)
The Create Custom Survey option will provide you with a blank canvas, with several different question types, elements, and exercises to choose from.
After selecting Create Custom Survey, you will be taken to the very first page of the survey setup wizard called the Define page.
Within the Define screen, you will be asked to define the parameters of your project.
Survey Name: This will be the name of your survey visible to members.
Internal Survey Name: This name will not be visible to members.
Audience Culture: This will define both the language and region of the audience you would like to reach. It will also drive the language of respondent instructions, error messages, and targeting variables available for the survey.
Category: This variable is used to categorize studies for our norm database.
Subcategory: This helps to further classify surveys within specific categories to enrich the information we have available for norms.
Random Assignment Checkbox: This option should be selected if your study requires upfront quota balancing in order to achieve even distribution across groups or concepts. Click here for more information on random assignments.

Next, you will need to define the audience you are looking to target.
Toluna Influencers will allow you to seamlessly leverage the Toluna community for responses within your survey.
My Own Audience will allow you the opportunity to upload your own list of respondents for your survey.

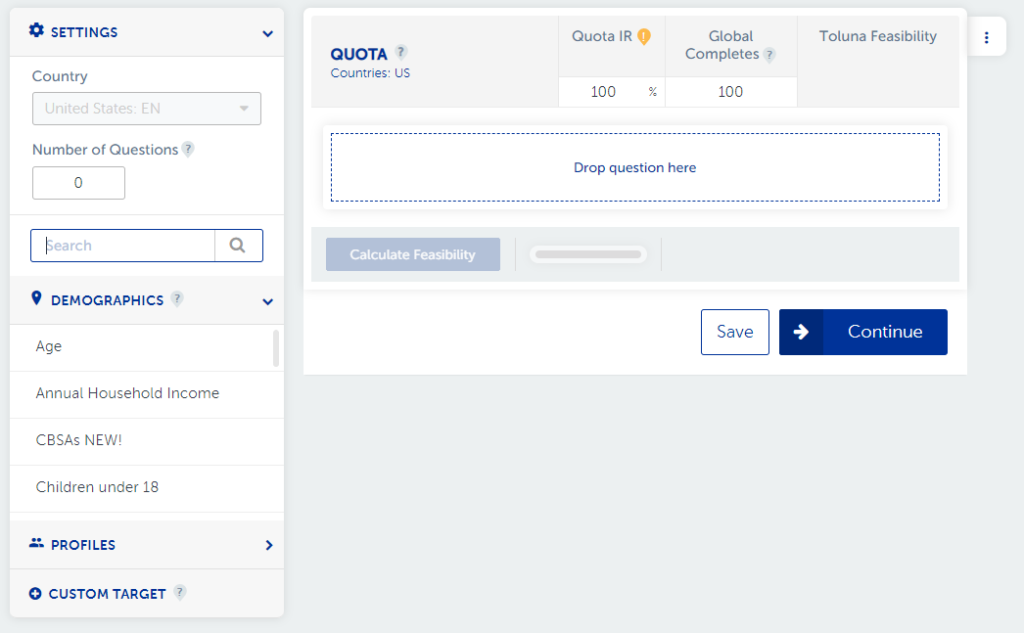
Now that you’ve defined your project details and the audience type, you will be taken to the target screen of your survey. The target screen depicted below is what will be visible if Random Assignment has not been selected on the Define screen. For more information on Random Assignment, click here.
Note that if you’ve selected My Own Audience as your sample source, the target screen will not appear.
On the target screen, you should see the country and audience language that you selected on the Define screen. The targeting options available on this screen will adjust based on the language and region selected.
You have the option to enter the Number of Questions in your survey, however, this field will also automatically update as you add questions to the build section.
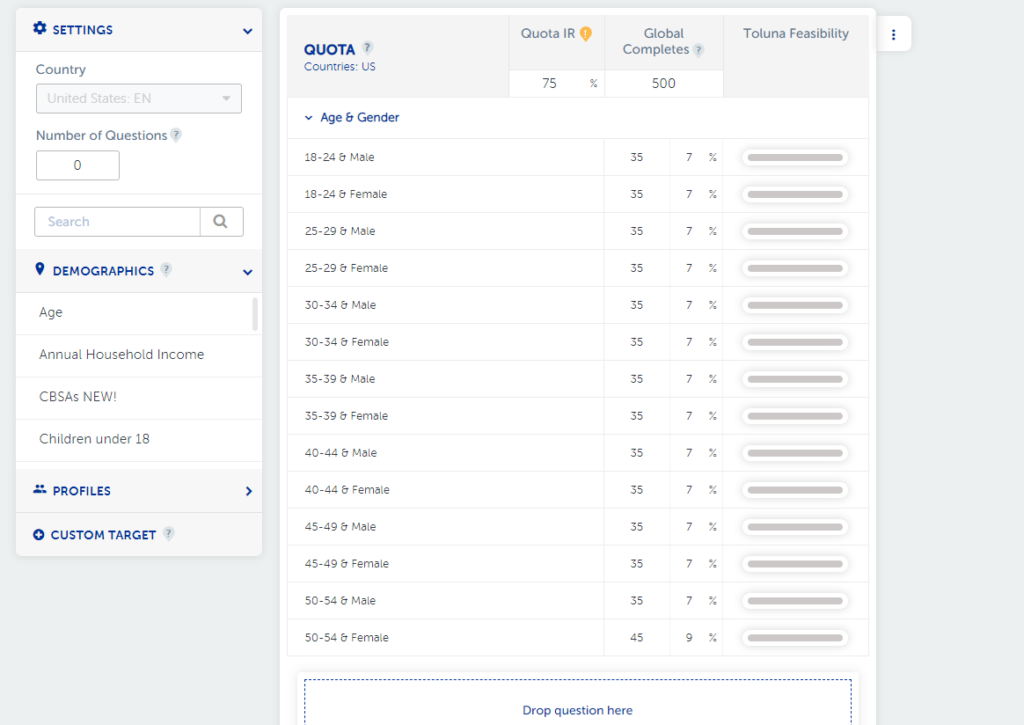
Next, you can select from a series of targeting variables available for our members. We offer standard demographics such as age, gender, and region as well as more in-depth profiles if you are looking for a more specific audience.
Can’t find what you are looking for? Use our Custom Target option to pre-profile members before they even enter your survey.
Please note: that if you use this option, it is critical that you also enter an incidence estimation to reflect the approximate number of qualified respondents based on the screener being set up. For more information on our Custom Target feature, click here.
Variables can be added to the target by simply dragging and dropping the option needed from the left-hand pane beneath the quota section. Multiple variables can be added in layers, or quotas can be interlocked. We recommend interlocking quotas to get the best results.
Enter your estimated target incidence and the number of completed interviews you’d like to receive. Ensure the targets have been set for each quota. Use the magic wand function to evenly distribute completes across your quota cells.
Once your target has been set, you can calculate your feasibility in real-time by simply selecting Calculate Feasibility along the bottom of the screen.
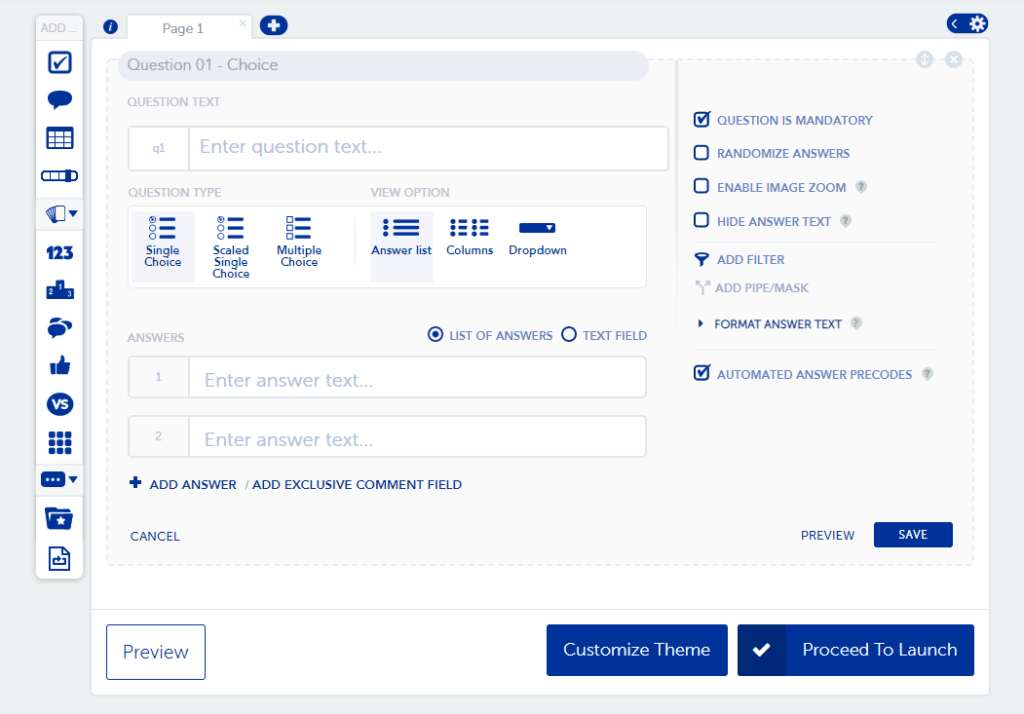
Once your target is all set, you will be taken to the “build” section of the survey. This is where you will add in all of the questions, elements, and exercises available on the left-hand side of the page.
Once you are satisfied with the build of your survey, the next step is to Proceed to Launch.
Regardless of the sample type, you are launching to, there are a few steps that are important to take in order to ensure the survey experience is optimal for respondents.
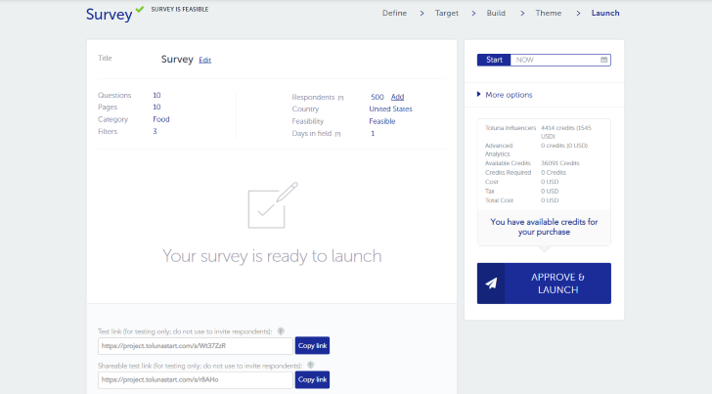
Step 1: Review your survey details. Make sure that the information displayed in terms of number of survey questions, incidence estimation, number of completes, and country all align with your needs and expectations.
Step 2: Test your survey using the test links at the bottom of the page. You can select from a link with the “jump to” feature which will allow you to jump from question to question (this is not recommended for surveys using filters and logic. The other option is the standard test link which requires testing of the full survey.
Step 3: Once you’ve reviewed all aspects of the project, you are ready to launch!
If you are launching to Toluna Influencers, you will simply be able to review the cost of the project, Approve and Launch. If you do not have enough credits to launch your project, you can purchase additional credits at this point as well.
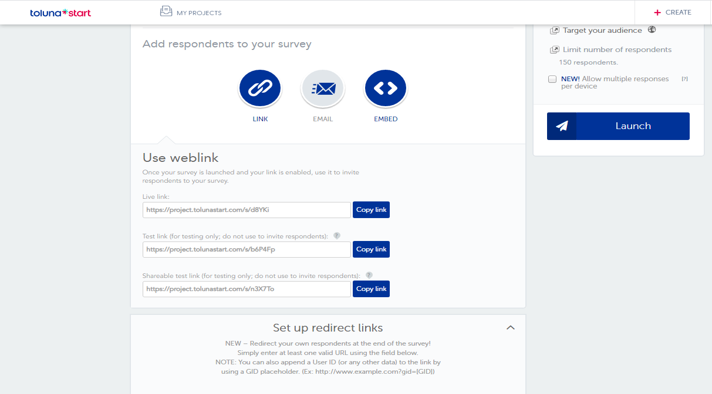
If you are launching to your own audience, you will have several options for survey distribution:
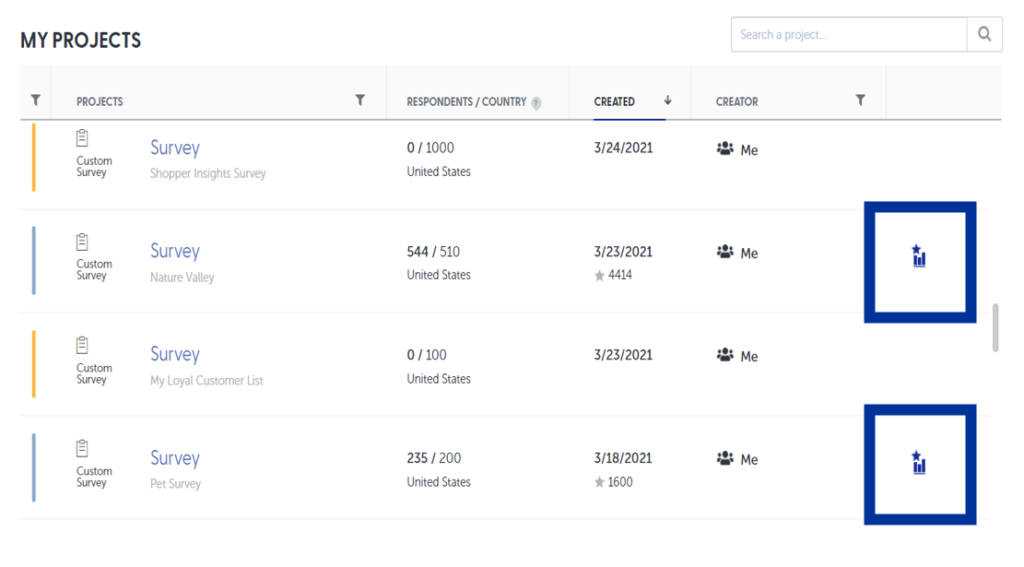
Once your survey is live and in the field, you will have the opportunity to monitor it in real-time using our Analytics link – the standard output on every Toluna project. Once the survey has collected the first respondent, your report will become available on your My Projects page.
Once you select the report, you will be taken to a live dashboard showcasing the results of your respondents in real-time.
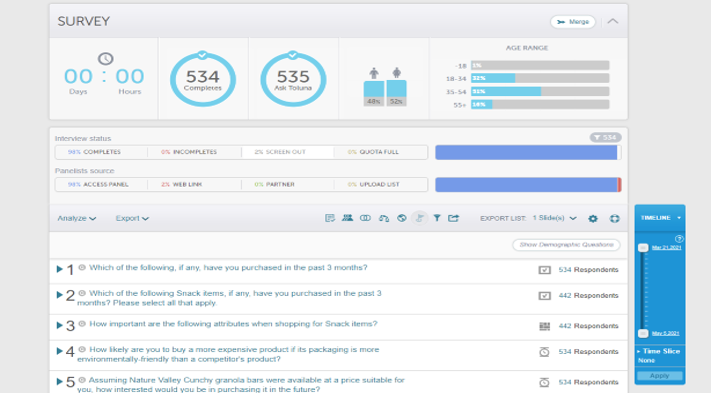
Leverage the host of analytical functions, export options, and sharing capabilities all from within your report.
Analyze your survey using functions such as top/bottom boxes, subpopulations, significance testing, derived questions, and weighting. Additionally, if you’d like to hide the answers of a group of respondents, you have the ability to upload a “hide respondent” file which will be excluded from your survey results.
Export your entire report into PowerPoint or Excel for ease of sharing and presenting your results. Upload custom PowerPoint templates to create a branded presentation.
Additionally, if you are looking for raw data, this is available for export in excel and SPSS as well.
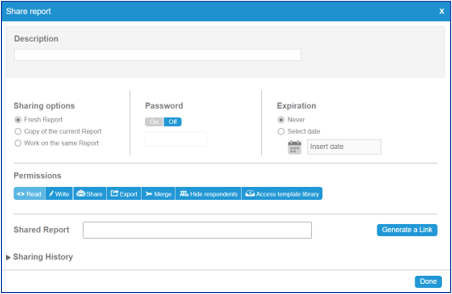
Share your survey with clients or stakeholders. Create a link to a fresh report, a copy of the report you’ve created, or allow your team to collaborate within your report. You can enable a password protection feature or link expiry, depending on who you plan to share with.
Add or remove permissions to export, share, merge or hide within your shared report.
Questions on building out a custom survey? Contact us
Don’t have time to become a survey pro? Let our team of experts assist you. For more information on working within the Toluna Start platform, visit our resource center at TolunaCorporate.com.


 Back to Blog

